Free shipping on all US order $38 and over with code FLYFREE
June 20, 2024
June 17th - 23rd is National Pollinator Week 2024!
It's time to celebrate pollinators! These wonderful little creaturesΒ are not only delightful to admire, but are so essential to all life on our planet!
FromΒ Pollinator Partnership:
'Pollinator Week is an annual celebrationΒ in support of pollinator health that was initiated and is managed by Pollinator Partnership. It is a time to raise awareness for pollinators and spread the word about what we can do to protect them...Pollinator Week 2024 is a celebration of the vital role that pollinators play in our ecosystems, economies, and agriculture...These essential creatures, including bees, butterflies, moths, bats, beetles, and hummingbirds, are the unsung heroes behind the food we enjoy and the beauty that surrounds us.'
This year's event envisions a future in which pollinators not only survive, but thrive! We wanted to take this opportunity to share some of our favorite pollinator-themed non-profits!
Pollinator Partnership:
Pollinator Partnershipβs mission is to promote the health of pollinators through conservation, education, and research.Β Signature initiatives include theΒ NAPPCΒ (North American Pollinator Protection Campaign),Β National Pollinator Week, and theΒ Ecoregional Planting Guides. Learn more byΒ downloading theirΒ Protecting Pollinators, People, and the PlanetΒ brochure!
During Pollinator Week, the Pollinator Partnership encourages us all to participate byΒ planting for pollinators, hosting garden tours, participating in online bee and butterfly ID workshops, and so much more.Β They also have a limited editionΒ Pollinator Week ShirtsΒ available to show your support for pollinators!
Xerces Society:
TheΒ Xerces SocietyΒ for Invertebrate Conservation is an international nonprofit organization that protects the natural world through the conservation of invertebrates and their habitats.Β The Xerces Society is a science-based conservation organization, working with diverse partners that include scientists, land managers, educators, policymakers, farmers, and communities. Learn more about pollinator specific effortsΒ here!
We strive to celebrate and increase awareness about the importance of pollinators through our vegan & cruelty-free paper specimens, and wanted to take this opportunity to share some of our favorite pollinator specimens!
Perhaps the most famous of the pollinators, we just love watching adorable bumble-bees as they spread pollen from flower to flower!
Β
Our 'Meadow' and 'Woodland' Butterfly Collections feature North American pollinators. These collections feature some of the beautiful butterflies you may encounter in your own backyard, neighborhood park or out hiking!
You might think of mostly day-flying creatures when you think of pollinators, but bats are also important members of this group! Our 'Nocturne' set includes a Brown Long-Eared Bat, as well as its matching skeleton.Β
Finally, the 'Pollinator' Set highlights the genius of mimicry in nature - featuring the beloved Monarch and its two copy-cats, the Viceroy and Queen butterflies. Butterflies and Moths play a crucial role in our ecosystem as pollinators of a wide range of flora. At Moth & Myth we're dedicated to giving back to our community and biosphere as well, and will be donating $5 from our retail sales of each of these sets to theΒ Pollinator Partnership
We hope you have a happy National Pollinator Week, and that pollinators prosper for all the future years on our planet!
May 10, 2024
We had the pleasure of collaborating with IMAGINARI - a new immersive and imaginative art exhibit in New York City - to create displays that highlight the beauty of butterflies and other insects. For this brand new museum in Manhattan, Moth and Myth created larger-than-life morpho butterflies, bell-jars, and an infinity mirror featuring hundreds of paper insects.
About IMAGINARI:
"IMAGINARI, derived from the Latin word for "imagination," is a creative and multidisciplinary space dedicated to celebrating the wonders of the world around us. Our mission is to shed light on the beings and ecosystems that often go unnoticed, giving voice to the voiceless, and raising awareness of their importance in our shared ecosystem.
Giant ladybugs crawl across the floor at IMAGINARI
Our approach is a delightful blend of tradition and innovation. IMAGINARI bridges the gap between the conventional museum experience and the playful, interactive elements of the experiential trend. In a fast-paced and often chaotic world, we seek to offer solace through the soothing embrace of creativity and beauty.Β "
Giant clouds and realistic oversized paper butterflies create a fantastic photo opportunity!
Moth and Myth co-owner Kari-Lise traveled to New York City to help install the giant specimens, and to attend the opening day.
Β
The enormous Morpho butterflies Moth & Myth created were too large for the equipment we usually use, and had to be assembled out of five different pieces. They were shipped flat to New York, and suspended from the ceiling with fishing wire.
Infinity mirror and bell jars installed at IMAGINARI
We created the infinity mirror entirely from scratch, with moths, beetles, dragonflies, cicadas, and leaf insects. The process of making the mirror is complicated. We had to make a 2 way mirror (see image below) and put the insects on another mirror then layer both together with lighting to create the effect. This was an enormous undertaking as our first commissioned infinity mirror!
Other highlights included in the exhibit are the six bell jars we made. These paired with the infinity mirror show the versatility of our moths and butterflies!Β
Photo credit Harol BaezΒ
Β We also created hundreds of paper Monarch butterflies, which are displayed on a cherry blossom tree, mimicking how these butterflies behave during their migration!
Β
Β IMAGINARI features beautiful art exhibits including sculptures, objects, photography, and immersive opportunities. If you're in New York City, we highly recommend visiting the museum to be inspired by insects big and small and to see our works for yourself! You can get your tickets here!
Macro insect photography by Thorben Danke @sagaoptics on display at IMAGINARI
IMAGINARI is located atΒ
200 Hudson Street
New York, New York
10013 United States
January 22, 2024
We wanted to give a few tips for resellers displaying our products at their shops! Below you'll find an introduction to our brand, as well as suggestions for how to incorporate our paper specimens into displays and merchandising.Β
Our products are packaged flat on a cardstock backing, protected in a clear plastic sleeve. They can be easily displayed on card racks! Below is an example of a display at Terra Bella Flowers.
Alternately, they can also be worked into table displays with other products, as showcased in the below photo by Crush & Touch Art Supply.
We recommend having a few unpackaged specimens near the sellable product. This helps convey to customers that the specimens can be removed from the backing, and that they are printed double-sided. We love how LUCCA Great Finds displayed a few paper moths and butterflies in a mirrored glass case!Β
Alternately, you can make a craft project with some specimens,Β like this shadowbox by Grapheme using our Micro specimens, to give customers ideas and showcase the interactive nature of our products.
Our paperΒ moths and butterflies compliment a wide range of other products, and we suggest incorporating them into displays and pairing them creatively with like-minded products.
Finally, you'll find a few interactive Kits in our catalog, including a Watercolor Kit and Coloring Kit. We suggest displaying these with art supplies,Β like at Crush & Touch Art Supply.
We hope that these ideas help incorporate our products into your shop! We always love seeing creative ways that our products are displayed. Please tag us in your shop's photos @mothandmyth
Β
September 27, 2023
In this fun and easy tutorial, we'll show you how to create an adorable Halloween garland with Moth & Myth paper bat specimens! This project takes under an hour to complete, is appropriate for all ages, and requires just a few supplies!Β
Follow along with the video and written steps below!
Supplies:
* Halloween Bat Multi-PackΒ
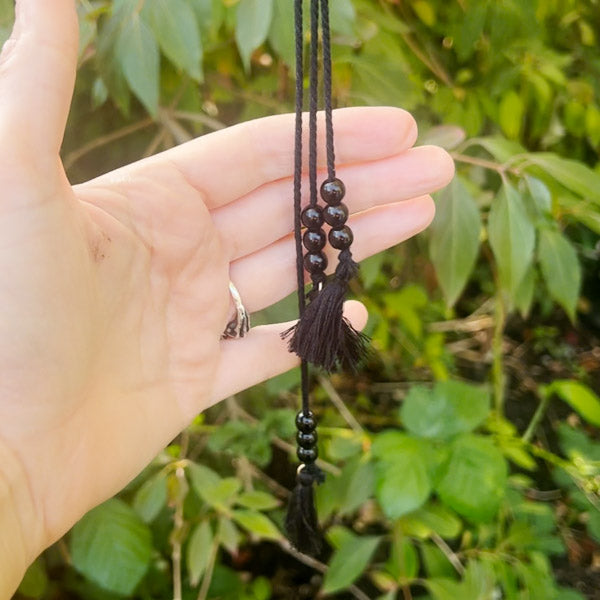
* Black 2mm RopeΒ
* Black Acrylic Beads 2mm HoleΒ
* Black TasselsΒ
* Hole Punch or Exacto Knife
* Scissors
Start by making holes in the wings of the bats for the rope to go through. You can do this with either the hole-punch or Exacto knife. We recommend placing the hole on the vein on the paper bat wings - this doesn't need to be exact!Β
Next, we're going to cut three pieces of the rope. The first one will be 6' long - this one will be used as the main part of the garland. The other two will be 24" long - these will be the tassel ends.Β
We'll work with the shorter lengths first! We'll string 6 beads on each of the shorter lengths of rope. We lightly singed the ends of rope first, to make threading the beads a little easier.
Once we've threaded all the beads, we'll tie one tassel on each end of the shorter ropes with a simple knot.Β
Fold the shorter lengths of rope at the middle point and separate the beads (3 on each end).
Now that we've completed the shorter ropes, we'll move on to the 6' long one! We'll start by threading 3 beads on one end, and adding one tassel with a knot.Β
With one end complete, it's time to start threading the bats! We'll thread them from the opposite end of the rope. You can play around with how you would like your bats to be positioned, and remember that they can alternate between facing forwards and backwards if you'd like!
Once all the bats are strung on the garland, it's time to complete the other end of the long rope. Add three more beads and one tassel.Β
Next, we'll tie our shorter lengths of rope onto the long rope to complete the tassel ends. We like these to be at varying lengths to make the tassel ends more dynamic, so play around with how you like it and then tie the shorter ropes onto the longer one with a knot.Β
All that's left now is to style the bats to make them appear even more life-like!Β We'll gently curl their wings & ears around our fingers to give them a bit of shape and really bring them to life.
And that's all there is to it! The bat garland is a fun an easy piece of decor that's perfect for the Halloween season. You can pack it away and use it again in future years!Β
We can't wait to see how you'll decorate for Halloween with Moth & Myth paper specimens, and hope you've enjoyed this tutorial!Β
Β
September 18, 2023
Today we're thrilled to guide you through creating beautiful Apothecary Jar decorations with specimens from our 'Wunderkammer' Collection! These jars make for unique and sophisticated Halloween decor, and look wonderful on a bookshelf or curiosity case year round. It's a simple project with few materials, and best of all you don't harm the paper specimens in any way when creating these jars! We've written out the steps below to three different jars, and you can also follow along on Youtube!Β
Β
The materials you'll need are really simple and easy to come by! In this project we use:
Glass Apothecary Jar: We sourced ours online at Amazon - they were sold as a set of three for under $50. You can find many different shapes, sizes, and styles, and you really can't go wrong.Β
Moss and Natural Materials: For some styles of jars, you'll want to use moss and other types of natural materials to add texture and visual interest. In our Seahorse Apothecary Jar, we use two different types of moss (which you can often find at a floral shop) and a bit of dried seaweed we collected from the beach!Β
Paper Specimens:Β The double-sided paper skeletons and specimens in our Wunderkammer Relics Collection are perfect for these Jars. In this tutorial, we are working with the 'Seafoam' Seahorse, 'Temptress' Snake, and limited 'Weaver' Spider & Spiderweb sets.
Optional Adhesive:Β You can create this Apothecary Jars without using any glue or adhesive, but we use a small amount of Museum Putty in the snake jar.Β
We sourced moss from a florist, and collected dried seaweed from a local beach.Β
Glass Apothecary Jars are easily sourced online. Ours came as a set of 3 with different silhouettes.
The first Apothecary Jar we'll create features the largest seahorse from our 'Seafoam' Wunderkammer Collection. We chose the longest jar for this, because it complements the shape of the paper specimen.Β
Begin by placing a bit of moss in the bottom of the jar. We started with Spanish Moss, which we gently placed in the bottom (there's no need to smush it down!), and continued layering with a different type of moss to add more texture.Β
Continue layering with your natural materials. We used a darker piece of dried seaweed next, so that the light coloration of the seahorse pops out against it. Once you're happy with the natural materials, it's time to gently pop in the paper specimen!Β
All that's left now is to put the glass top on the Apothecary Jar! We decorated ours with a small moth from the 'Witching Hour' Collection, which we attached with a small amount of Museum Putty.
Next, we'll create the Spider & Spiderweb Apothecary Jar. This is one is very simple, but also very stunning, and features the 'Weaver' Set. This soft-spun Spiderweb is also sold individually in the 'Gossamer' Set or, as a Multi-Pack, but it's only here until October 31st!Β
Begin by gently placing the spiderweb into the jar. We chose a slightly wider Apothecary Jar for this specimen, to show off the details of the web.
When you're happy with how the web is positioned, it's time to add the spider. Gently bend the legs around your fingers to give them a bit of shape. There's no need for glue to attach it - just work two or three of the little legs into the gaps of the spiderweb, and it will stay in place!Β
Next, put the glass lid on the jar, and enjoy this spooky seasonal creation!Β
Finally, we'll create an Apothecary Jar with our 'Temptress' Snake Skeleton. For this jar, we use two snake skeletons. The first step is to gently bend the ribs of the snake around your fingers, to give them a bit of natural shape. We also break the few ribs where the paper snake is connected, to make it more flexible.Β
We take the first shaped snake, and work it into the bottom of the Apothecary Jar. You can play with the positioning, but the first snake is mostly there to add shape and volume.Β
When the first snake is in place, it's time for the second one! We work the tail and a few of the coils into the jar, but leave the head out, wrapping around the outside of the jar. This gives a really interesting dimensional look to this Apothecary Jar!Β
If you're having a hard time getting the snake's head to stay positioned how you'd like it, a bit of Museum Putty will help keep it in place.Β
This project takes under an hour, but you can take your time collecting natural materials and playing with the placement of the specimens. We hope you're enjoyed this tutorial, and are inspired to work with our paper specimens for yourself!Β
Β
Β
Β
Β
July 06, 2023
Today we'll cover how to use the Passion Flower Kit & Passion Flower Poster in a shadowbox! This is a fun and easy project, and a wonderful way to make a beautiful piece of decor from start to finish!Β
MaterialsΒ you'll need for this project:
Passion Flower Kit & Poster
Shadowbox - We're using an 11" x 14" Shadowbox that fits the poster perfectly! This shadowbox is available from Amazon
Putty or adhesive of your choice! We're using Museum Putty, but hot glue or glue dots would also work!
Before you begin putting together your shadowbox, remember to assemble your Passion Flower! We have another tutorial that goes over all of the necessary steps!
1. Take off the frame and glass of your shadowbox so you can work with the backing
2. Flip over the Passion Flower Poster and put a little bit of Museum Putty (or other adhesive) in each corner to attach it to the Shadowbox backing
3. With the poster attached to the backing, it's time to start placing your flower and butterflies! There's no wrong place to put these, so play around and find what looks good to you before adding adhesive!
4. We're adding a little bit of adhesive on each tendril to give more dimension to the flower.
5. Style your butterflies by gently bending the wings where they meet the body, and curling the wing-tips. Then play around with placement and attach them to the poster!
6. When you're happy with where the elements are placed and everything is adhered to the poster, all that's left is to put the shadowbox frame back together!
7. Fasten all of the clamps on the back of the frame, and you're done!
That's all there is to it! Once you're finished, you'll have a beautiful multi-dimensional shadowbox to display your Passionflower and butterflies!Β
May 31, 2023
What's a betterΒ pairingΒ than butterflies and flowers? In this fun & easy tutorial, we'll cover how to add Moth & Myth paper butterflies and moths to a floral arrangement!Β Follow alongΒ as Kari-Lise styles and adds specimens to a beautiful bouquet!
All you need to create a beautiful butterfly bouquet of your own is:
Once you're finished, your butterflies will really look like they're flying out of the bouquet! We hope you enjoy this project, and can't wait to see what you'll create!
Β
May 25, 2023
Welcome to Moth & Myth 101! We wanted to put together a guide for how to style our butterflies to make them appear even more life-like, and talk about which adhesives work best for a variety of projects! Follow along as Kari-Lise decorates a glass terrarium using three different adhesives in the video below!Β
As mentioned in the video, our favorite adhesives are:
Museum Putty - which holds our specimens in place without damaging the specimen or the item it is being attached to. Museum Putty is fantastic for many projects, but it is not permanent, and can move around over time, especially when exposed to changing temperatures.
Double-Sided Tape - there are many options for double-sided tape, and most of them work quite well! In the video, we are using a heavy-duty tape, that needs to be cut down to the desired size. In our experience, this tape can damage the specimen if you choose to remove it, but does not damage the wall or other item you are attaching the specimen to.Β
Hot Glue - which is fantastic for projects where you wish to permanently attach our specimens!
We hope that this little guide helps give some ideas about how to use our specimens in a variety of different projects!Β
May 10, 2023
Β ο»ΏWe're pleased to present "Overgrowth" a art installation for Ghost Gallery. Below is the story of this piece and you can find out more about us at here.Β Follow us at Moth & Myth
She clutched the tattered invitation tightly, stained and crumpled from hours of turning it over with sweaty fingers while waiting on the train for the miles to slip by. It had been such an unexpected summoning from her childhood friend Rose β no word for years, and now out of the blue, an invitation to a tea party.
Β
Rose had suddenly moved away from the town they grew up in, where they had shared golden afternoons in gardens, invented games to which no one else knew the rules. It had been like a great dark void at first when Rose moved to the North, but over the years the ache grew less and less, until she barely thought of it these days. When the letter had arrived, with its sudden invitation to the mist-enveloped countryside where Rose now resided, she was uncertain if she would even go. Yet curiosity tugged at her, and she gathered a beaded party-gown, fine lace gloves, and a small gift for her friend as a token of goodwill.
Β βTeatime. Tuesday. The First of Spring.β Was all the delicately printed card had specified.
Β
Β An old taxi dropped her at the huge wrought iron garden gates, and she stood for a moment gathering her thoughts, then slowly pushing open the creaking doors to the garden. The air was chill despite the spring light, and she gathered her shawl a bit tighter to her shoulders. A narrow vaulted tunnel of thick hedges led into the grounds, tangled and overgrown in a thick tapestry of branches and vines. The path turned this way and that, maze-like, and she felt a wave of dizziness overtake her like vertigo, following the small trail deeper into the garden. What an unusual place β she could not picture the young Rose she remembered living here. A thick blanket of leaves covered the pathway undisturbed by footfalls, the deeper she walked into the garden.
Β
It felt like an age had passed by the time she came upon the clearing. There, a small table stood between flowers and vines, catching the faint rays of light that penetrated from the tangled roof far above. The space was filled with a hushed velvet silence, only broken by the occasional sigh of the wind scraping over branches and leaves, and the soft hum of wings from the myriad of butterflies crawling over the blanket of moss and vines. The table was set for an opulent afternoon tea, fruits and cakes, luscious honeycomb, and two tea settings, yet this too had fallen into a state of decay. It appeared as if it had been waiting years for her arrival, and slowly time and nature had reclaimed it along with the rest of the estate. There was no sign of Rose, no sign any human had entered this place in many years. She brushed aside some of the plants overtaking one of the chairs, and sat down to ponder this odd situation.
Β
Suddenly it struck her β the mysterious invitation did not actually specify a time, or a year. When had Rose sent it? Had it been delayed, perhaps even a decade, and only now mysteriously arrived?
Β
A hushed sound like the brushing of long skirts over the forest floor pulled her back from her reverie. At the edge of the clearing, a woman was walking towards the little table. Only it was not a woman, but more of a glimmer and then a shadow, like light dancing on leaves, in the shape of a person. A breath was trapped in her throat in anticipation, what would this apparition do? When the vines wrapped themselves around her wrist, and then her ankle, rooting her to the wooden chair, she barely felt their soft embrace.
Β
'In the Garden of Earthly Delights' Butterfly Collection
'The Faerie-Tails Collection II'
Β
May 01, 2023 2 Comments
March 23, 2023
We wanted to share a creative tutorial with you for your everyday curio cabinet and that fits nicely into the Easter season! We had a lot of fun creating this display piece for our Seattle studio, and hope you'll enjoy following along and creating your own gorgeous Egg Dome!Β
1. Materials
The materials youβll need for this project are:
2. The paint
We went a bit wild with the selection of spray paints - you certainly don't need this many! For a fun springtime Egg Dome, we suggest a few pastels with some darker shades for contrast. We use spray paint for a smooth even finish, but you can use acrylic paint as well.
3. Drill a hole in the eggs
Using your drill & 1/4" drill bit, drill a hole in the wooden eggs to match the size of your dowels. You don't need a deep hole just one that the dowel will fit comfortably in. We recommend doing this before painting the egg (unlike our photo)!
4. Paint the dowels
To paint them, make sure your work area is covered, and spray the dowels evenly while rotating. We use a gold/brass color for the dowels. To dry stick them upright in Styrofoam.Β Β
5. Paint the eggs
Once the dowels are dry use a bit of hot glue in the hole of the eggs to firmly keep the dowels held to the eggs. Once glue has dried mask the dowel with painters tape. Then spray paint and rotate the egg forΒ an even finish putting them back in the styrofoam to dry or for heavier eggs a water glass w/out water making sure the egg doesn't touch the edges. Don't cut the dowels yet.
Β
7. Assemble and Arrange the Egg Dome
Β
To assemble the egg dome, we drilled 1/4" holes about a 1/4" down in the wooden base of our cloche to fit the dowels. We start drilling with the focal point egg. At this point you're not gluing the eggs in the drilled holes just planing. Ours is the large green egg.
Once you decide where your focal point is map out around your center egg. To create a dynamic display make sure no two eggs are the same height. After you're happy with where theΒ focal point egg is next find where your tallest egg will go and drill the hole for that egg.Β
Now you're on a roll! Continue to place your next eggs cutting the dowels to size (alway check twice that the length is what you want before cutting)Β with the wire cutters and drilling a 1/4" hole to place in base.Β Make sure they all fit inside your glass cloche!Β Do not glue the dowels to the base until you're happy with the arrangement. Once you are happy, lift dowels out put a pea size drop of hot glue in the holes in the base and place the dowels back holding in place while the glue dries.
9. Enjoy the finished product!
We love the is project and think it's a great fit for any time of year. Inspired by natural bird eggs we added our own twist on them to make them extra special.Β
Following the steps above, it's fun and relatively easy to create a beautiful glass cloche egg dome that's perfect for spring and Easter time! We hope you've enjoyed this tutorial!