Free shipping on all US order $38 and over with code FLYFREE
March 12, 2021
Making shadowboxes is a fun and easy craft project to do at home, and a wonderful way to create new art for your walls. Using our lifelike paper specimens makes it sustainable and vegan! While there’s many different styles of shadowboxes you can make (including one we've already shared!), today we’ll walk you through how to put together a Kaleidoscope Shadowbox with our paper Monarch and Viceroy butterflies.
Fun Fact: Did you know that a group of butterflies is called a Kaleidoscope?
To start, we got a Keepsake Box from a craft store. These boxes are great for displaying memorabilia and curiosities. The one we chose is 11”x14” with a 1.5” depth, and features a back wall covered in felt.
To adhere our butterflies to the box, we used one-sided velcro with sticky adhesive on the other side, which we cut into small pieces to fit the butterflies. This strategy worked well given the material of our shadowbox, but you can also use small pins to pin the butterflies, as you would with real specimens.
While working with hot-glue is a great way to make your shadowbox durable, we suggest finalizing your layout before using such a permanent option!
Starting with the center of your design is a great way to make sure the kaleidoscope spirals out evenly. We decided to work outwards from small to large, but the opposite looks great as well!
To make your butterflies appear more lifelike, bend them at the crease between wing and body, and gently curve their wings with your fingers.
Continue working outwards with your design. We made many adjustments along the way depending on what looked and felt right. There’s no right or wrong - just have fun and play with the placement!
Look at what you're doing from different angles to get a new perspective!
When you’re happy with your butterfly kaleidoscope, simply put your Shadowbox frame on the backing, and enjoy it!
We chose the Monarch and Viceroy butterflies for this project because they are available in three different sizes in our shop (Life-sized, Mini, and Micro), but you can create wonderful kaleidoscopes using just regular sized butterflies or minis as well!
If you would like to order any style of butterfly in bulk, as we used in this project, please email us at wholesale@moth-and-myth.com
December 08, 2020
November 16, 2020
It can be a challenge as a new or experienced artist to take photos of your own work. As a tool for our lovely network of creators, we wanted to share our simple guide for shooting outstanding product photos with your phone! These are tips we've learned over time, and we think you might be able to benefit from them as well. All you need is a phone with a camera, a background, and a little patience and creativity.
Lighting
Pick a spot that has natural lighting but not direct sun light. Natural lighting helps the color look the most accurate. A shaded outdoor patio is a great place to set up for your photoshoot!
Avoid: Fluorescent, over head, and direct sunlight. Any light that skews in the extreme can cause unwanted shadows, make the work look flat, causes glare and alters the color, which can be hard to correct.
Background
Select a simple, clean, light or dark background. This will help your artwork stand out and look its best. We used a large white piece of drawing paper on a clipboard for our shoot. If your artwork is light, a dark background may help it pop instead!
Avoid: Cluttered and patterned backgrounds. These distract from the work and pull focus. If you do have a patterned background, use a Tilt Shift tool on the Instagram photo editor, or shoot in Portrait Mode to soften the background and make your work stand out (example with the fern photo below).
Shoot
Shooting straight downwards at your piece in a flat-lay is a great way to showcase your work. Our set-up was on low table so we could shoot directly downwards at a comfortable height. You should have at least one photo of your piece that represents it in this way. Try other angles too that you can share and add to the product listings.
Edit
Look through your photos to see which ones stand out the most, and edit those! If your photos are shot in soft, natural light, they won’t require much editing, but a few tweaks like added brightness can help them shine! Since most platforms favor square photos, make sure your artwork is centered in the frame and leave yourself a little room to crop on the long sides of your shot.
Best Filters to use on Instagram:
Before and after comparison of the edited photo and original. We used the Instagram edits listed above, increasing brightness, brightening highlights, dialing up contrast for clarity, and increasing saturation for vibrancy.
The last step is simple...
Share your work! You've shot multiple photos, edited the ones that stand out and now it's time to share! Hooray!
Portrait Mode: If your phone camera has Portrait Mode, try using it when shooting your artwork! This setting will blur the background like a traditional camera lens would.
Find your style: Have fun and play around - don’t be afraid to try things that don’t end up working, and discover what fits your unique artwork!
Humanize the photo: We naturally respond more to photos that have a human element, and this is easy to utilize in your product photography! Try taking photos of your hands holding your artwork, or enlist a friend to help you get the shot! This will humanize the photo as well as your artwork.
We hope this has been a helpful guide. Have fun with your shoots, and tag us in your photos @mothandmyth! We can't wait to see what you'll create!
Thank you to Breana Murphy (IG @slightlycrude) for lending us the beautiful resin piece for this tutorial!
October 23, 2020 1 Comment
Named for their cryptic underwing pattern, the Giant Owl Butterfly (Caligo memnon) is found throughout the Amazon rainforest all the way up to Mexico. These wing patterns include eyespots evocative of owl eyes, which are believed to be a form of mimicry to deter predators.
Featured in our limited ’Witching Hour’ Collection, the giant owl butterfly is perfect for the spooky Halloween season. While many butterflies are day-flying, the owl butterfly prefers to fly at dusk. Their Latin name “caligo” means darkness.
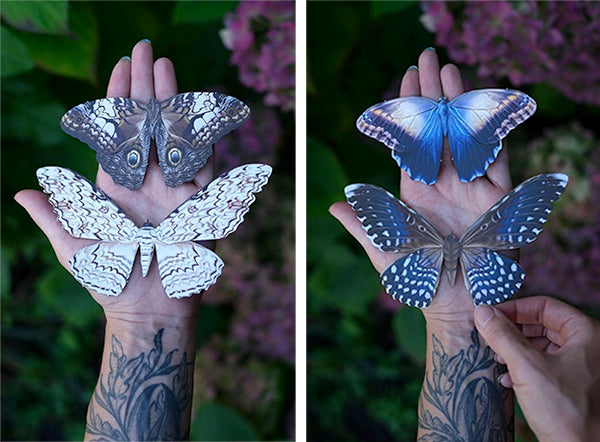
While all of our paper specimens are double-sided, the Giant Owl Butterfly is one of just a few that features a distinct reverse side, which is no less striking than the owl-like underwings.
Front and back of the Giant Owl Butterfly and White Witch Moth
Owl butterflies are very large, ranging from 3”–8”, and our papercut specimen is approximately 5” across. A tiny version of this giant insect can be found in our ‘Halloween’ Mini Collection!
How will you use the Giant Owl Butterfly in your art and decorating?
October 11, 2020
October 07, 2020 1 Comment
October 01, 2020
September 27, 2020
September 27, 2020
Resin art and objects by Hybrid Hollow featuring Moth and Myth paper butterflies and moths.
September 27, 2020
Its easy to make a Vegan Shadowbox with Moth and Myth paper moths! All you need are paper specimens, a pen and paper, glue dots, and a box.
September 27, 2020
Elegant wall-hangings by resin artist The Moon Indigo, featuring Moth and Myth paper moths and butterflies. Pressed flowers accentuate the colors of the cruelty-free specimens so nicely! For availability and more information, please visit their shop!
Images and objects by The Moon Indigo (IG @themoonindigo)
https://www.etsy.com/shop/moonindigojewelry
September 27, 2020